关于linux救援主机的使用指导
-
什么是救援主机
救援主机(Rescue Instance)可以对一台故障的主机进行人工运维。
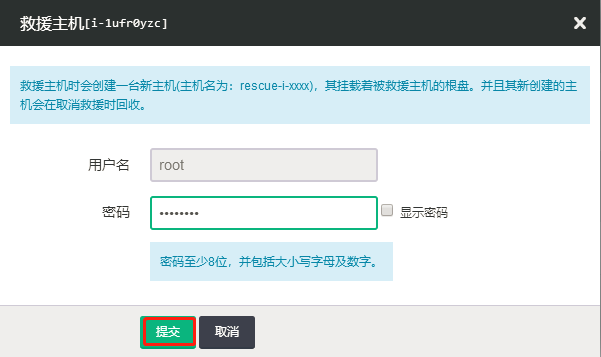
假如主机( ID 为 i-1ufr0yzc )进入救援主机的模式,会产生一台新主机以 rescue-i-1ufr0yzc 命名,并且被救援主机i-1ufr0yzc 的根盘挂载到了新主机 rescue-i-1ufr0yzc里面。在新主机 rescue-i-1ufr0yzc 里面完成运维操作后,在控制台对被救援主机 i-1ufr0yzc 执行『取消救援』的操作,即完成主机i-1ufr0yzc的救援运维工作。什么情况下需要救援主机来修复
由于一些人为或者意外的原因导致系统无法正常启动,比如修改/etc/fstab、 /etc/rc.d/rc.sysinit, /etc/rc.local等系统启动文件时误操作就会造成linux无法进入,这个时候就需要使用救援主机来修复系统,以下场景可以尝试使用救援主机来修复如何进入救援模式
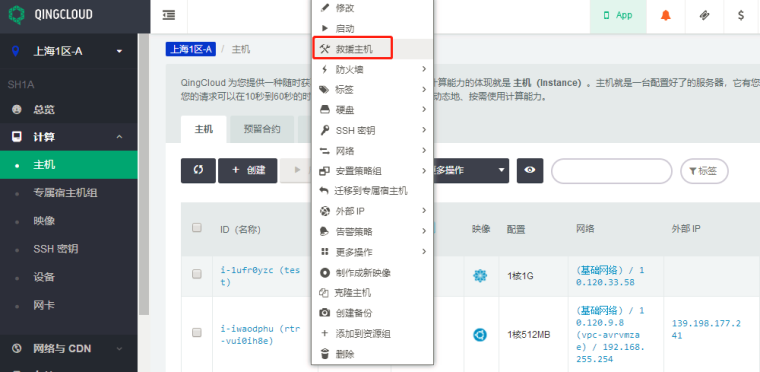
1、先将主机关机
2、右键主机的id—救援主机

哪些场景需要用到救援主机
- 修改密码
1、为了使用方便,可以把救援主机加入到私有网络,使用vpn或者端口转发的方式连接到救援主机
2、登陆到救援主机,使用fdisk -l命令查看源主机的系统盘符
[root@rescue-i-1ufr0yzc ~]# fdisk -l
Disk /dev/sdb: 1073 MB, 1073741824 bytes
34 heads, 61 sectors/track, 1011 cylinders
Units = cylinders of 2074 * 512 = 1061888 bytes
Sector size (logical/physical): 512 bytes / 512 bytes
I/O size (minimum/optimal): 512 bytes / 512 bytes
Disk identifier: 0x00000000Disk /dev/sda: 21.5 GB, 21474836480 bytes
255 heads, 63 sectors/track, 2610 cylinders
Units = cylinders of 16065 * 512 = 8225280 bytes
Sector size (logical/physical): 512 bytes / 512 bytes
I/O size (minimum/optimal): 512 bytes / 512 bytes
Disk identifier: 0x000ee761Device Boot Start End Blocks Id System
/dev/sda1 * 1 2611 20970496 83 LinuxDisk /dev/sdc: 21.5 GB, 21474836480 bytes
255 heads, 63 sectors/track, 2610 cylinders
Units = cylinders of 16065 * 512 = 8225280 bytes
Sector size (logical/physical): 512 bytes / 512 bytes
I/O size (minimum/optimal): 512 bytes / 512 bytes
Disk identifier: 0x000ee761Device Boot Start End Blocks Id System
/dev/sdc1 * 1 2611 20970496 83 Linux
3、从上面可以看出,源主机的系统盘分区为sdc1,直接把源主机的系统分区挂载到救援主机
mount /dev/sdc1 /mnt
4、使用df -hT命令查看一下分区是否挂载成功
[root@rescue-i-1ufr0yzc ~]# df -hT
Filesystem Type Size Used Avail Use% Mounted on
/dev/sda1 ext4 20G 790M 18G 5% /
tmpfs tmpfs 499M 0 499M 0% /dev/shm
/dev/sdc1 ext4 20G 790M 18G 5% /mnt
5、使用chroot命令切换根分区为/mnt
chroot /mnt
6、现在可以直接操作源主机的系统了,使用passwd root命令重置密码
[root@rescue-i-1ufr0yzc /]# echo “Test123456” | passwd --stdin root
Changing password for user root.
passwd: all authentication tokens updated successfully.
7、退出救援主机,结束

- 修复fstab文件
无法正常启动主机,提示remounting root filesystem in read-write mode[FAILED],如图所示

这个情况是由于根分区挂载失败,即使进入了系统也无法做任何操作,因为系统盘可能处于只读模式,需要进入救援主机修复fstab文件
1、进入救援主机,步骤参考以上,略
2、挂载源主机的系统分区,步骤略
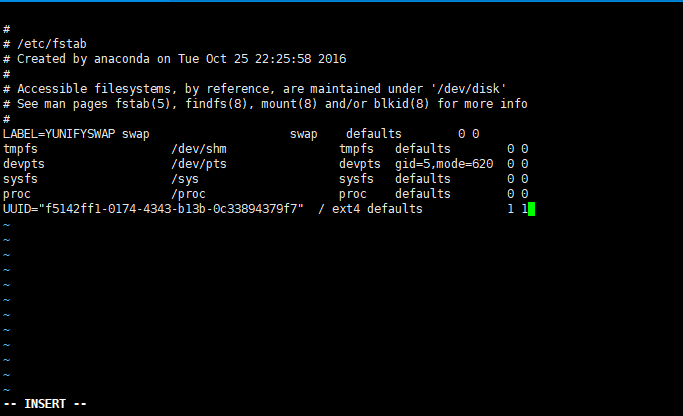
3、查看一下fstab文件
[root@rescue-i-1ufr0yzc etc]# cat /mnt/etc/fstab

以上可以看出根分区没有配置自动挂载
4、使用blkid命令获取根分区的uuid
[root@rescue-i-1ufr0yzc etc]# blkid /dev/sdc1
/dev/sdc1: UUID=“f5142ff1-0174-4343-b13b-0c33894379f7” TYPE="ext4"
5、使用uuid的方式配置根分区自动挂载
vi /mnt/etc/fstab 添加以下一行代码,保存退出
UUID=“f5142ff1-0174-4343-b13b-0c33894379f7” / ext4 defaults 1 1
6、退出救援主机,并启动源主机,结束
备注:如果设置自动挂载的时候,使用/dev/sdc1 这样的写法,导致无法启动也可以使用以上方案 - 修复grub配置文件
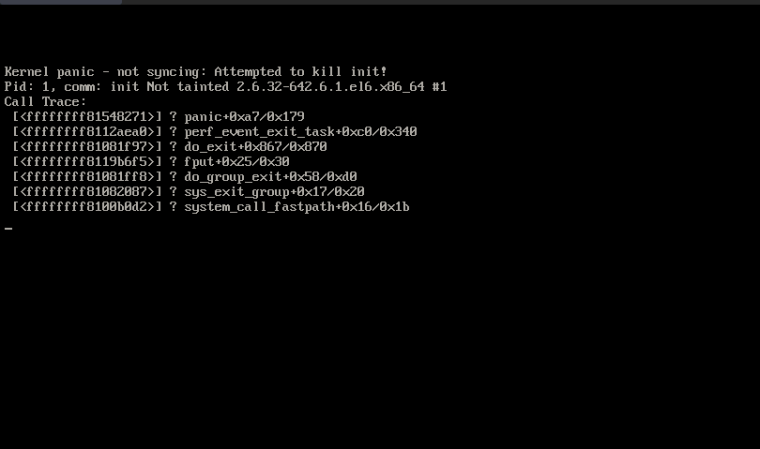
假如grub.conf文件被篡改,系统启动的时候会出现黑屏或者kernel panic,如图所示

1、进入救援主机并挂载源主机的系统盘
2、将救援主机的grub.conf文件拷贝到源主机的boot目录
cp /boot/grub/grub.conf /mnt/boot/grub.conf
或者手动去编辑grub.conf文件,比如
default=0
timeout=5
title CentOS (2.6.32-642.6.1.el6.x86_64)
root (hd0,0)
kernel /boot/vmlinuz-2.6.32-642.6.1.el6.x86_64 ro root=UUID=f5142ff1-0174-4343-b13b-0c33894379f7 rd_NO_LUKS rd_NO_LVM LANG=en_US.UTF-8 rd_NO_MD SYSFONT=latarcyrheb-sun16 crashkernel=auto KEYBOARDTYPE=pc KEYTABLE=us rd_NO_DM rhgb quiet vga=789 console=tty1 console=ttyS0
initrd /boot/initramfs-2.6.32-642.6.1.el6.x86_64.img
3、退出救援模式,启动主机试下 - 修复MBR启动引导
假如我使用dd命令破坏了硬盘的MBR
dd if=/dev/zero of=/dev/sda bs=1 count=400
清空mbr 前400字节,使用sync命令同步到硬盘,启动的时候,会报如下的错误
1、关机并启动救援主机,将源主机的系统盘挂载到救援主机
[root@rescue-i-eddlmlau ~]# mount /dev/sdc1 /mnt
[root@rescue-i-eddlmlau ~]# df -h
Filesystem Size Used Avail Use% Mounted on
/dev/sda1 20G 790M 18G 5% /
tmpfs 499M 0 499M 0% /dev/sh
/dev/sdc1 20G 790M 18G 5% /mnt
2、使用grub-intall命令重新安装mbr
[root@rescue-i-eddlmlau ~]# grub-install --no-floppy /dev/sdc
Unknown partition table signature
Unknown partition table signature
Unknown partition table signature
Unknown partition table signature
Unknown partition table signature
Unknown partition table signature
Unknown partition table signature
Unknown partition table signature
Unknown partition table signature
Unknown partition table signature
Unknown partition table signature
Unknown partition table signature
Unknown partition table signature
Installation finished. No error reported.
This is the contents of the device map /boot/grub/device.map.
Check if this is correct or not. If any of the lines is incorrect,
fix it and re-run the script `grub-install’.
(fd0) /dev/fd0
(hd0) /dev/sda
(hd1) /dev/sdb
(hd2) /dev/sdc
3、sync命令同步到硬盘,退出救援模式并启动主机centos7以上的系统使用grub2-install /dev/sdc命令重装MBR
- grub配置文件丢失
启动的时候显示grub命令行,如下图的情况
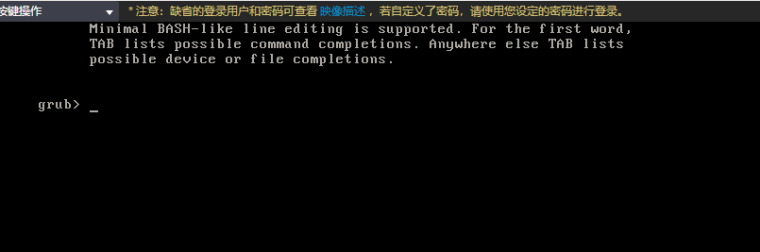
1、进入救援模式,挂载源主机的系统盘
2、使用grub2-install命令重新安装grub.cfg配置文件
[root@rescue-i-k578r9ga ~]# grub2-mkconfig -o /mnt/boot/grub2/grub.cfg
Generating grub configuration file …
Found linux image: /boot/vmlinuz-3.10.0-693.el7.x86_64
Found initrd image: /boot/initramfs-3.10.0-693.el7.x86_64.img
Found linux image: /boot/vmlinuz-0-rescue-b2942a79696a4216b528ab0e9c10f754
Found initrd image: /boot/initramfs-0-rescue-b2942a79696a4216b528ab0e9c10f754.img
Found CentOS Linux release 7.4.1708 (Core) on /dev/vdc1
done
[root@rescue-i-k578r9ga ~]# cd /mnt/boot/grub2
[root@rescue-i-k578r9ga grub2]# ls
device.map fonts grub.cfg grubenv i386-pc locale
3、使用sync命令同步操作,退出救援模式,done
- 修改密码
